Monday, 3 October 2016

Basics of the Transuducer

What is transducer:

                   A transducer is a device which transforms a non-electrical physical quantity (i.e. temperature, sound or light) into an electrical signal (i.e. voltage, current, capacity…)
       
                                                                 (or simply)


                   A transducer is a device that converts energy from one form to another.

Principle of operation :


The transducer has basically two main components :  1. Sensing Element
                                       2. Transduction Element

1. Sensing Element: 
                     The physical quantity or its rate of change is sensed and responded to by this part of the 
transducer .

2. Transduction Element:
                     The output of the sensing element is passed on to the transduction element. This element is 
responsible for converting the non-electrical signal into its proportional electrical signal. There are certain cases when the transduction element itself performs both the action of  transduction and sensing. The best example of such a type transducer is a thermocouple. 

3.Input :
               Some examples of input are : Resistance ,capacitance , inductance, heat

4. Output :
              Some examples of output are : voltage , force , displacement , pressure ,current.


Types of Transducer:

There are of many different types of transducer, they can be classified based on various criteria as: 

Types of Transducer based on Quantity to be Measured
  1. Temperature Transducer
  2. Pressure transducers
  3. Displacement transducers 
  4. Flow transducers
Types of Transducer based on the Principle of Operation
  1.  Photovoltaic
  2. Piezoelectric
  3. Mutual Induction
  4. Electromagnetic
  5. Photoconductors
Types of Transducer based on Whether an External Power Source is required or not
  1. Active Transducers
  2. Passive Transducers

  1. Active Transducers:
                Active transducers are those which do not require any power source for their operation. They work on the energy conversion principle. They produce an electrical signal proportional to the input (physical quantity). Some of the active transducers are

  • Thermocouple
  • Piezoelectric transducer
  • Photo-voltaic Cell 

  1. Passive Transducers:
              Transducers which require external power supply for their operation is called passive transducers. They produce an output signal in the form of some variation in resistance, capacitance or any other electrical parameter, which than has to be converted to an equivalent current or voltage signal.
  • Light Dependent Resistor
  • Strain Gauge
  • Resistance thermometer
  • Themistor
  • Variable capacitance pressure gauge
  • Dielectric Gauge
  • Ionisation Chamber
  • Photo-emissive cell

Basic requirements of Transducers:

Transducers should meet the basic requirements of
  1. Ruggedness
  2. Linearity
  3. Repeatability
  4. High output signal quality
  5. High reliability and stability
  6. No hysteresis

1. Ruggedness: It should be capable to withstand over loads.

2. Linearity: Its Input and output characteristics should be linear.

3. Repeatability: It should give same output for the same iput, If applied again and again.

4. High output signal quality: The output should have high signal noise ratio

5. High reliability and stability: The output should be reliable and stable.

6. No Hysteresis: It should not give any hysteresis effect, when varied from low to high value or vice-versa
Sunday, 25 September 2016

CONCEPT OF THE CALIBRATION

What is calibration ?

                                  There are as many definitions of calibration as there are methods. According to ISA’s the word calibration is defined as “A test during which known values of measurand are applied to the transducer and corresponding output readings are recorded under specified conditions.” 
The definition includes the capability to adjust the instrument to zero and to set the desired span.

                                 Typically, calibration of an instrument is checked at several points throughout the calibration range of the instrument. The calibration range is defined as “the region between the limits within which a quantity is measured, received or transmitted, expressed by stating the lower and upper range values.” The limits are defined by the zero and span values. The zero value is the lower end of the range. Span is defined as the algebraic difference between the upper and lower range values. The calibration range may differ from the instrument range, which refers to the capability of the instrument.

                                For example, an electronic pressure transmitter may have a nameplate instrument range of 0–750 pounds per square inch, gauge (psig) and output of 4-to-20 milliamps (mA). However, the engineer has determined the instrument will be calibrated for 0-to-300 psig = 4-to-20 mA. Therefore, the calibration range would be specified as 0-to-300 psig = 4-to-20 mA. In this example, the zero input value is 0 psig and zero output value is 4 mA. The input span is 300 psig and the output span is 16mA.


CHARACTERISTICS OF A CALIBRATION:

Calibration Tolerance: 
                              Every calibration should be performed to a specified tolerance. The terms tolerance and accuracy are often used incorrectly. The definitions for each are as follows:

Accuracy: 
                             The ratio of the error to the full scale output or the ratio of the error to the output, expressed in percent span or percent reading, respectively.

Tolerance: 
                            Permissible deviation from a specified value; may be expressed in measurement units, percent of span, or percent of reading. By specifying an actual value, mistakes caused by calculating percentages of span or reading are eliminated. Also, tolerances should be specified in the units measured for the calibration.

For example, you are assigned to perform the calibration of the previously mentioned 0-to-300 psig pressure transmitter with a specified calibration tolerance of ±2 psig. output tolerance would be:

                                           2 psig÷300 psig ×16 mA= 0.1067 mA

The calculated tolerance is rounded down to 0.10 mA, because rounding to 0.11 mA would exceed the calculated tolerance. It is recommended that both ±2 psig and ±0.10 mA tolerances appear on the calibration data sheet if the remote indications and output milliamp signal are recorded.

                               Note the manufacturer’s specified accuracy for this instrument may be 0.25% full scale (FS). Calibration tolerances should not be assigned based on the manufacturer’s specification only. Calibration tolerances should be determined from a combination of factors. These factors include:

  • Requirements of the process
  • Capability of available test equipment
  • Consistency with similar instruments at your facility
  • Manufacturer’s specified tolerance
Example: 
                             The process requires ±5°C; available test equipment is capable of ±0.25°C; and manufacturer’s stated accuracy is ±0.25°C. The specified calibration tolerance must be between the process requirement and manufacturer’s specified tolerance. Additionally the test equipment must be capable of the tolerance needed. A calibration tolerance of ±1°C might be assigned for consistency with similar instruments and to meet the recommended accuracy ratio of 4:1.

Why calibration is important?

                            It makes sense that calibration is required for a new instrument. We want to make sure the instrument is providing accurate indication or output signal when it is installed. But why can’t we just leave it alone as long as the instrument is operating properly and continues to provide the indication we expect. Instrument error can occur due to a variety of factors: drift, environment, electrical supply, addition of components to the output loop, process changes, etc. Since a calibration is performed by comparing or
applying a known signal to the instrument under test, errors are detected by performing a calibration. An error is the algebraic difference between the indication and the actual value of the measured variable.

Typical errors that occur include:


Span Error


Zero Error 


Combined Zero and Span Error 


Linearization Error


                                Zero and span errors are corrected by performing a calibration. Most instruments are provided with a means of adjusting the zero and span of the instrument, along with instructions for performing this adjustment. The zero adjustment is used to produce a parallel shift of the input-output curve. The span adjustment is used to change the slope of the input-output curve. Linearization error may be corrected if the instrument has a linearization adjustment. If the magnitude of the nonlinear error is unacceptable and it cannot be adjusted, the instrument must be replaced.

                               To detect and correct instrument error, periodic calibrations are performed. Even if a periodic calibration reveals the instrument is perfect and no adjustment is required, we would not have known that unless we performed the calibration. And even if adjustments are not required for several consecutive calibrations, we will still perform the calibration check at the next scheduled due date. Periodic calibrations to specified tolerances using approved procedures are an important element of any quality system.

When should you calibrate your measuring device?

A measuring device should be calibrated:
                           According to recommendation of the manufacturer. After any mechanical or electrical shock. Periodically (annually, quarterly, monthly) Hidden costs and risks associated with the un-calibrated measuring device could be much higher than the cost of calibration. Therefore, it is recommended that the measuring instruments are calibrated regularly by a reputable company to ensure that errors associated with the measurements are in the acceptable range.

Tuesday, 20 September 2016

Characteristics of an Instrument-2

                                        To choose the instrument, most suited to a particular measurement application, we have to know the system characteristics and to have a clear understanding of all the parameters involved in defining the characteristics of the measurement device..
                                        The performance characteristics of instruments and measurement systems can be divided into two distinct categories:

                                        i)Static characteristics

                                        ii)Dynamic characteristics

In this article we will be discussed about Dynamic characteristics . Refer the following URL for the static characteristics http://instrmentationtechnics.blogspot.in/2016/09/static-characteristics-of-instrument_15.html

ii)Dynamic characteristics:

                                       Instruments rarely respond to the instantaneous changes in the measured variables.Their response is slow or sluggish due to mass, thermal capacitance, electrical capacitance, inductance etc. sometimes, even the instrument has to wait for some time till, the response occurs. These type of instruments are normally used for the measurement of quantities that fluctuate with time.
                                       The behavior of such a system, where as the input varies from instant to instant, the output also varies from instant to instant is called as dynamic response of the system. Hence, the dynamic behavior of the system is also important as the static behavior.

The dynamic inputs are of two types:
                                                 a) Transient
                                                 b) Steady state periodic

a) Transient:
                       Transient response is defined as that part of the response which goes to zero as the time becomes large.

b) Steady state periodic:
                        The steady state response is the response that has a definite periodic cycle.

The variations in the input, that are used practically to achieve dynamic behaviour are:

Step input:-
                         The input is subjected to a finite and instantaneous change. E.g.: closing of switch.

Ramp input:-
                         The input linearly changes with respect to time.


Parabolic input:-
                           The input varies to the square of time. This represents constant acceleration.

Sinusoidal input:- 
                              The input changes in accordance with a sinusoidal function of constant amplitude.


The various static characteristics are:
                                                    i) Speed of response
                                                    ii) Measuring lag 
                                                    iii) Fidelity 
                                                    iv) Dynamic error 
                                                    v) Bandwidth 
                                                   vi) Time constant 
                                                   vii) Settling time

i) Speed of response:

                                    It refers to its ability to respond to sudden changes of amplitude of input signal. It is usually specified as the time taken by the system to come close to steady state conditions, for a step input function. Hence the speed of response is evaluated from the knowledge of the system performance under transient conditions and terms such as time constant, measurement lag, settling time and dead time dynamic range are used to convey the response of the variety of systems, encountered in practice.

                                                                         (or simply)

It is defined as the rapidity with which a measurement system responds to changes in the measured quantity.

ii) Measuring lag:

                                   It is the retardation or delay in the response of a measurement system to changes in the measured quantity. The measuring lags are of two types:
 a) Retardation type: In this case the response of the measurement system begins immediately after the change in measured quantity has occurred.

 b) Time delay lag: In this case the response of the measurement system begins after a dead time after the application of the input. 

iii)Fidelity:

                                    It is defined as the degree to which a measurement system indicates changes in the measurand quantity without dynamic error.


iv) Dynamic error:

                                   It is the difference of true value of the quantity changing with the time the value indicated by the instrument provided static error is zero. Total dynamic error is the phase difference between input and output of the measurement system.

                                                                         (or simply)

                                    It is defined as the degree to which a measurement system is capable of faithfully reproducing the changes in input, without any dynamic error.


v) Bandwidth:

                                   It is the range of frequencies for which its dynamic sensitivity is satisfactory.For measuring systems, the dynamic sensitivity is required to be within 2% of its statics sensitivity.

 vi) Time constant:

                                  It is associated with the behaviour of a first order system and is defined as the time taken by the system to reach 0.632 times its final output signal amplitude. System having small time constant attains its final output amplitude earlier than the one with larger time constant and therefore, has higher speed of response.

vii) Settling time:

                                It is the time required by the instrument or measurement system to settle down to its final steady state position after the application of the input. Fo portable instruments, it is the time taken by the pointer to come to rest within - 0.3% to +0.3% of its final scale length while for panel type instruments, it is the time taken by the pointer to come to rest within -1% to +1% of its final scale length. Smaller settling time indicates highest speed of response.Settling time is also dependent on the system parameters and varies with the condition under which the system operates. 

Thursday, 15 September 2016

Characteristics of an Instrument-1

                         To choose the instrument, most suited to a particular measurement application, we have to know the system characteristics and to have a clear understanding of all the parameters involved in defining the characteristics of the measurement device.
                         The performance characteristics of instruments and measurement systems can be divided into two distinct categories:
                                           i)Static characteristics

                                          ii)Dynamic characteristics

                        In this article we will be discussed about static characteristics. and  Dynamic characteristics in the next article.

Static characteristics:

                      Applications involve the measurement of quantities that are either constant or vary only quite slowly with time. Under these circumstances it is possible to define a set of criteria that gives a meaningful description of quality of measurement without interfering with dynamic descriptions that involve the use of differential equations.These criteria is called static characteristics.
                     Thus the static characteristics of a measurement system are those which must be considered when the system or instrument is used under a condition not varying with time.
                                                                     (Or)
                                                                  (Simply)

                     The set of criteria defined for the instruments, which are used to measure the quantities which  are slowly varying with time or mostly constant, i.e., do not vary with time, is called Static Characteristics.

The various static characteristics are:
                                                             1. Accuracy
                                                             2. Precision 
                                                             3. Sensitivity
                                                             4. Linearity
                                                             5. Reproducibility
                                                             6. Repeatability
                                                             7. Resolution 
                                                             8. Threshold
                                                             9. Drift
                                                             10. Stability
                                                             11. Tolerance
                                                             12. Range or span
                                                             13. Hysteresis
                                                             14. Bias
                                                             15. Dead zone
                                                             16. Static error
                                                             17. Backlash
                                                             18. Conformance
                                                             19. Distortion
                                                             20. Noise

1. Accuracy: It is the One of the most important Characteristic of the instrument.

                       Accuracy is the degree of closeness with which the reading approaches the true value of the quantity to be measured.
                                                                            (or)
                      Accuracy of a measurement describes how close the measurement approaches the true value of the process variable.
                      Thus means The accuracy of a measurement indicates the nearness to the actual/true value of the quantity.Accuracy can be specified in terms of inaccuracy or limits of errors and can be  expressed in the following ways:

a) Point accuracy:
                      This is the accuracy of the instrument only at one particular point on its scale.The specification of this accuracy does not give any information about the accuracy at other points on the scale or in the words,does not give any information about the general accuracy of the instrument.

b) Accuracy as percentage of scale span:
                     When an instrument as uniform scale, its accuracy may be expressed in terms of scale range.

c)Accuracy as percentage of true value:
                      The best way to conceive the idea of accuracy is to specify it in terms of the true value of the quantity being measured within +0.5% or 0.5% of true value.

   [Note: Simply can says Accuracy is a measure of how close the measured value is to the true value.]

2. Precision: 

                      This is a measure of the deviation from a mean value computed from a set of readings obtained for a single given input. In other words It is the measure of reproducibility i.e., given a fixed value of a quantity, precision is a measure of the degree of agreement within a group of measurements.

The precision is composed of two characteristics:
a) Conformity: 
                     Consider a resistor having true value as 2385692 , which is being measured by an ohmmeter. But the reader can read consistently, a value as 2.4 M due to the nonavailability of proper scale. The error created due to the limitation of the scale reading is a precision error.
b) Number of significant figures:
                    The precision of the measurement is obtained from the number of significant figures, in which the reading is expressed. The significant figures convey the actual information about the magnitude & the measurement precision of the quantity.
Where, P = precision
            Xn = Value of nth measurement
            Xn = Average value the set of measurement values 

3. Sensitivity : 

                  The sensitivity denotes the smallest change in the measured variable to which the instrument responds. It is defined as the ratio of the changes in the output of an instrument to a change in the value of the quantity to be measured.

Thus, if the calibration curve is liner, as shown, the sensitivity of the instrument is the slope of the calibration curve. If the calibration curve is not linear as shown, then the sensitivity varies with the input. Inverse sensitivity or deflection factor is defined as the reciprocal of sensitivity. Inverse sensitivity or deflection factor = 1/ sensitivity.
                                    For example, a temperature measuring system that uses a platinum resistance temperature device (RTD) produces a change in resistance as the temperature changes.  The input is temperature and the output is resistance.  The output over the input is therefore,
                                                   Sensitivity = DR/DT           Units = W/°C

4. Linearity:

                                  It defines the proportionality between input quantity and output signal. If the sensitivity is constant for all values from zero to full scale value of the measuring system,then the calibration characteristic is linear and is a straight line passing through origin. If it is an indicating or recording instrument the scale may be made linear. In case there is a zero error the characteristic assumes the form of equation given by y=mx+c where y is output,x is input,m is slope and c is intercept.
                                 Linearity is the closeness of the calibration curve of a measuring system to a straight line.If an instruments calibration curve for desired input is not a straight line, the instrument may still be highly accurate. In many applications, however, linear response is most desirable.

Linearity is defined as,
      linearity=Maximum deviation of o/p from idealized straight line/Actual readings

                                              Linear curve                                 Non-linear curve

5. Reproducibility:

                           Reproducibility is defined as the degree of closeness by which a given value can be repeatedly measured.The reproducibility is specified for a period of time.Perfect reproducibility signifies that the given readings that are taken for an input, do not vary with time..

6. Repeatability:
                          It is the characteristic of precision instruments. It describes the closeness of output readings when the same input is applied repetitively over a short period of time, with the same measurement conditions, same instrument and observer, same location and same conditions of use maintained throughout. It is affected by internal noise and drift. It is expressed in percentage of the true value. Measuring transducers are in continuous use in process control operations and the repeatability of performance of the transducer is more important than the accuracy of the transducer, from considerations of consistency in product quality.

7. Resolution :

                        The smallest change of the magnitude of the measurand that produces a minimum observable output of the instrument.
                        If the input to an instrument is increases slowly from some arbitrary non­zero value, it will be observed that the output of the instrument does not change at all until there is a certain minimum increment in the input. This minimum increment in what is input is called resolution of the instrument.Thus, the resolution is defined as the smallest incremental of the input quantity to which the measuring system responds..

8. Threshold:

                       If the instrument input is increased very gradually from zero there will be some minimum value below which no output change can be detected. This minimum value defines the threshold of the instrument. In specifying threshold, the first detectable output change is often described as being any noticeable measurable change.

9. Drift:
                      The change in the transducer output for a zero input or its sensitivity over a period of time, change in temperature, humidity or some other factor.Drift is classified into three categories:
                                              1)Zero drift 
                                              2)Span drift or sensitivity drift 
                                              3) Zonal drift

10. Stability:

                            The  ability  of  a  measuring  system to  maintain  standard  of  performance  over prolonged periods of time. Zero stability defines the ability of an instrument restore to zero reading after the input quantity has been brought to zero,while other conditions remain the same.

                                                             (Or simply)

                           The ability of an instrument to retain its performance throughout its specified storage life and operating life is called as Stability.

11. Tolerance:

                          The maximum allowable error in the measurement is specified in terms of some value which is called tolerance.
For example: A 1000W resistor with a tolerance of ±5% has an actual resistance between 950 and 1050W.

12. Range or span:

                         The minimum & maximum values of a quantity for which an instrument is designed to measure is called its range or span.
For exapmple: For a standard thermometer given the range 0° C to 100°C then span is 100°C . If the thermometers range is ­30 to 220°C, then the span is equal to 250°C.

13. Hysteresis:

                      This refers to the situation where different readings (outputs) are sometimes observed for the same input because the input was approached from different directions.  For example a thermometer exposed to an increasing temperature input (i.e. going from 0 to 100°C) may show a slightly different profile to that for the decreasing input (i.e. decreasing from 100 to 0°C).
                                                                    (Or simply)
The non­coincidence between the loading (increasing) and the unloading (decreasing) measurement curves.

Hysteresis curve

14. Bias:

                      The constant error which exists over the full range of measurement of an instrument is called bias. Such a bais can be completely eliminated by calibration. The zero error is an example of bais which can be removed by calibration.

15. Dead zone:

                      It is the largest change of input quantity for which there is no output of the instrument. For instance, the input applied to the instrument may not be sufficient to overcome the friction and will, in that case not move at all. 
                     It is due to either static friction(stiction), backlash or hysteresis. Dead zone is also known as dead band dead Space. All elastic mechanical elements used as primary transducers exhibit effects of hysteresis, creep and elastic after­ effect to some extent.

16. Static error:

                    It is the deviation from the true value of the measured variable. It involves the comparison of an unknown quantity with an accepted standard quantity. The degree to which an instrument approaches to its excepted value is expressed terms of error of measurement. 

17. Backlash:

                  The maximum distance or angle through which any part of mechanical system may be moved in one direction without applying appreciable force or motion to the next part in a mechanical sequence.

18. Conformance:

                  For a non­linear transducer, the tightness of fit to a specified curve is known as conformance of conformity.

19. Distortion:

                 The difference of the actual output from the expected result as defined by a known linear or non-linear relationship (curve) of input and output for the transducer.

20. Noise:

                A signal generated by internal circuitry or external interference that is superimposed or added to the output signal.


Thursday, 8 September 2016

RADIATION PROTECTION AND SAFETY FROM NUCLEONIC GAUGES

                           Ionizing radiation can be very hazardous to humans and steps must be taken to minimize the risks. This Section provides only a brief summary of some of the principles of radiation protection associated with the use of sources of ionizing radiation used in nucleonic gauges. In order to concentrate on the important principles a certain fundamental level of knowledge of radiation physics has been assumed. An explanation of quantities and units is available in other IAEA publications

                          The essential requirements for protection from ionizing radiation are specified in the International Basic Safety Standards (BSS). The Standards state that the prime responsibility for radiation protection and safety lies with the Licensee, Registrant or employer. Some of the fundamental requirements of the Standards relevant to nucleonic gauges are discussed in this section, but the Standards should be consulted in full for a comprehensive understanding of their requirements.

Principles of dose limitation:
The principles of dose limitation are briefly summarized below

  • 1.no application of radiation should be undertaken unless justified,
  • all doses should be kept “as low as reasonably achievable” (ALARA), economic and social factors being taken into account,
  • in any case, all individual doses must be kept below dose limits.

            It should be emphasized that the most important aspect of dose limitation, assuming that the practice is justified, is to keep radiation doses As Low As Reasonably Achievable (ALARA).


Dose limits: 
                   The dose limits for workers and the public are given below, although doses to gauge operators
are expected to be significantly below these levels during normal operations.

Occupational dose limits:
                  Occupational dose limits are chosen to ensure that the risk to radiation workers is no greater than the occupational risk in other industries generally considered safe. Radiation doses must always be kept as low as reasonably practicable, but some industries may require employees to routinely work in high radiation areas and therefore dose limits are required. The BSS specifies that doses to individuals from occupational exposure should not exceed:
  • an effective dose of 20 mSv per year averaged over 5 consecutive years
  • an effective dose of 50 mSv in any single year
  • an equivalent dose to the lens of the eye of 150 mSv
  • an equivalent dose to the extremities (hands or feet) or the skin of 500 mSv in a year.
Public dose limits:
                  If the use of nucleonic gauges may lead to the public being exposed, then the following dose limits must not be exceeded.
  • an effective dose of 1 mSv in a year
  • in special circumstances, an effective dose of up to 5 mSv in a single year provided that the average dose over five consecutive years does not exceed 1 mSv per year.
  • an equivalent dose to the lens of the ye of 15 mSv in a year
  • an equivalent dose to the skin of 50 mSv.

Authorization: 

                 In order to control the use of radiation sources and to ensure that the operating organization meets the requirements of the BSS, the legal person responsible for any radiation source will need to apply for an authorization from the national Regulatory Authority. This authorization is usually in the form of a license or registration. Prior to buying or acquiring a nucleonic gauging system, the operating organization will, therefore, need to apply for such an authorization from the regulatory authority. The regulatory authority will need details about the gauging equipment, such as: the purpose for which it will be used, the radionuclide(s) and activity, manufacturer and model, details of the storage facility and installation site, copies of approval certificates, end of life considerations (disposal or return to supplier) etc. The regulatory Authority will also need: information regarding the people who will be using the equipment, such as their qualifications and training in radiation safety etc. .Further details about the relevant legal and governmental infrastructure, the regulatory control of sources, and the notification and authorization for the possession and use of radiation sources are available from IAEA.

Inspection and enforcement:
                  The Regulatory Authority may inspect the registrant/licensee to audit their provisions for radiation safety and to physically inspect the premises. Enforcement action may be taken against the operating organization if the level of radiation protection and safety are considered unacceptable.

                 IAEA have published a ‘Categorization of Radioactive Sources’ which provides a relative ranking of radioactive sources in terms of their potential to cause severe deterministic effects (i.e. how ‘dangerous’ they are). The Categorization is composed of 5 Categories — with Category 1 sources being the most ‘dangerous’ and Category 5 the least ‘dangerous’. Gauges generally fall into categories 3 and 4.

Practical protection for gauge users:

                  The practical elements to radiation protection are: Time, distance, shielding and prevention of access. These are discussed in detail below.

Time: 
                  Radiation is normally emitted from a source at a constant rate and this is measured in microsieverts per hour (μSv/h) or millisieverts per hour (mSv/h). The shorter the time a person spends in the radiation field the lower the radiation dose will be to that individual. It is therefore advisable not to linger in areas where there may be high radiation levels and any work done close to a source should be done efficiently. This will help to ensure that the radiation risks are kept as low as reasonably achievable.

Distance: 
                  Radiation levels decrease rapidly with increasing distance and it is therefore important to never directly handle radiation sources. Specially designed tools with long handles must always be used if a source is to be replaced or manipulated.

Shielding: 
                 The main consideration for gauges is to prevent access to the high radiation levels close to the source. This can be achieved by providing an adequate thickness of suitable shielding material around the source. The amount of shielding required will be determined by the type and energy of the radiation and the activity of the source. For example several centimeters of lead may be required around a gamma source or a several millimeters of aluminium around a beta source. The environment in which the gauge will be used should also be considered when deciding on the material and design of the shielding (e.g. high temperature or corrosive chemicals could significantly reduce the effectiveness of the shielding).

Prevention of access:
               In many cases it is not possible to fully shield the source and the material to be examined. It will, therefore, be necessary to prevent access to any areas of high radiation by using shutters (manual or automatic), mechanical guarding or interlock systems. In some cases the designation of controlled areas may be additionally required in order to restrict access to authorized persons only.

Warning notices: 

               All radiation sources should display the radiation trefoil to warn of the potential hazard. Details of the radionuclide, activity on a specified date and serial number should be included on a label permanently attached to the source housing. Any shutters should be clearly marked to indicate the status of the source to persons in the vicinity. X ray equipment should also display a clear indication when radiation is being generated. Notices should state whether any controlled areas are designated around the gauge.

Radiation monitoring: 

             Operating organizations need to have in place an effective programme for monitoring occupational exposure to radiation. Guidance on establishing a monitoring programme for external exposure, the appropriate dosimetry to be used for workplace and individual monitoring and record keeping is given in an IAEA Safety Guide.

Workplace monitoring:
             Portable dose rate monitors can be used to measure radiation levels (normally in microsieverts or millisieverts per hour) around gauges. Monitoring may be carried out for several reasons, for example to:

  • check the shielding around a gauge is intact
  • check a shutter is closed before carrying out maintenance on or close to a gauge
  • check the radiation levels around a shipping container to ensure it is safe to transport
  • confirm the extent of a controlled area around a gauge
  • check the shielding around a source storage facility is acceptable.

Storage:

              There will be occasions when sources need to be stored. For example, portable gauges not in use, gauges removed from a production line during maintenance, old gauges awaiting disposal, etc. To ensure the safety and security of the sources the storage facilities should:
  • provide adequate shielding,
  • be physically secure (e.g. locked when not in use)
  • not be used as a general storage area for other goods
  • be fire proof and not contain other hazardous materials (e.g. flammable liquids) be dry
  • appropriately labeled (e.g. radiation trefoil and warning notices in a local language).
Source accountancy:
               Records need to be kept which show the location of each source at all times. National regulations may specify how frequently the accountancy checks need to be carried out, but in general, the following can be applied
  • sources in permanently installed gauges should be accounted for at least once per month
  • sources in portable gauges should be accounted for every day they are out of the store and once a week when they are in storage.

Maintenance:

               Nucleonic gauges are often used in harsh environmental conditions which may result in the radiation safety and protection of the gauge be adversely affected, for example; shielding may be degraded, shutters may stick, warning notices may become illegible, etc. It is therefore important that gauges are included in a routine maintenance schedule. Persons carrying out the maintenance work need to be aware of the radiation hazards and be appropriately trained. When working close to a gauge a radiation monitor should always be used to confirm that any shutters are fully closed and that the source is fully shielded.

Leak testing:
               When a new radioactive source is purchased it should be supplied with a certificate confirming that it is free from contamination. Periodic re-checks need to be carried out by an appropriately trained and qualified person to ensure that the structure of the source remains intact. Gauges that are used under harsh environmental conditions (e.g. high temperature, corrosive chemicals, and high levels of vibration) may need to be checked more frequently. The intervals for leak testing should not normally exceed 2 years (and may be more frequent), but this will normally be specified by the regulatory authority.


              Many accidents have occurred with disused or abandoned sources. Before a source is purchased, consideration needs to be given to what will happen to the source when it is no longer of use or if the operating organization goes bankrupt etc. In many cases the preferred option is to return the source to the supplier, possibly for recycling. Other options include permanent disposal or long-term storage. All options have financial and logistical consequences that need to be considered before the gauge is purchased.

Thursday, 26 May 2016

Basics of Nucleonic Gauges

PRINCIPLES OF NUCLEONIC GAUGES:

                        A nucleonic gauge consists of a suitable source (or a number of sources) of alpha, beta, gamma, neutron or X ray radiation arranged in a fixed geometrical relationship with one or more radiation detectors. Most of nucleonic gauges are based on a few most common nuclear techniques.


Natural gamma-ray technique
                      NCS based on natural gamma-ray technique utilize the correlation between natural gamma-ray intensity measured in one or more pre-selected energy windows and the concentration of particular elements (e.g. U, Th, K) or the value of a given parameter of interest (e.g. ash in coal).


Transmission:
                   
In the basic configuration of a transmission gauge the media to be measured is placed between the radioactive source and the detector so that the radiation beam can be transmitted through it (Fig.1). The media attenuates the emitted radiation (beta particles or photons) before reaching the sensible volume of the detector. Both source and detector can be collimated. The radiation intensity in the detector is a function of several parameter characteristics of the material.


FIG. 1. Principle of transmission method.


Dual energy gamma-ray transmission (DUET):

                        This technique is probably the most common nucleonic method for on-the-belt determination of ash content in coal. Ash content is determined by measuring the transmission through coal of narrow beams of low and high-energy gamma rays (Fig. 2). The absorption of the lower energy gamma rays depends on ash content, due to its higher average atomic number than that of coal matter, and on the mass per unit area of coal. The absorption of the higher energy gamma rays depends almost entirely on the mass per unit area of coal in the beam. Ash content is determined by combining measurements of the two beams. The determination is independent of both the bed thickness and the mass of the coal. The technique is also applicable to the analysis of complex fluid flow where multiple energy beams are usefully applied.


FIG. 2. Dual energy gamma ray transmission for on line measurement of coal ash concentration.


Backscattering:
                       Whenever a radiation beam interacts with matter a fraction of it is transmitted, a fraction absorbed and a fraction is scattered from its original path (Fig. 3). If the scattering angle is greater than 90o some photons or particles will come back towards the original emission point; the measurement of this radiation is the basis of the backscattering method.


FIG. 3. Principle of backscatter method.


Gamma-ray backscatter:
                          Measurement of radiation emitted by a stationary gamma-ray source placed in the nucleonic gauge and back-scattered from atoms of investigated matter enables some properties of this matter to be determined. The gamma-rays interact with atomic electrons resulting in scattering and absorption. Some of these gamma-rays emerge back from the investigated mater with degraded energy and intensity (count rate) characterizing the bulk density and the average chemical composition of the matter.


Neutron scattering (moderating): 
                         Fast neutrons of high energies emitted from the neutron source collide with nuclei of investigated matter reducing their energy. In general, neutrons lose more energy on collision with light nuclei than with heavy nuclei. Due to its light nucleus hydrogen is most effective in moderating neutrons from the source. As hydrogen is major constituent of most liquids detection of the liquid through container walls is possible, as well as measurement of the moisture (hydrogen density) of soils, coke or other materials.


Prompt gamma neutron activation analysis (PGNAA) and Delayed gamma neutron activation analysis (DGNAA):
                       When a material is bombarded with neutrons, interactions with nuclei result in the emission of high-energy gamma - rays, at a variety of energy levels. The nuclear reactions excite gamma-rays of energies specific to the target nucleus and the type of nuclear reaction. If the intensity and energy of these are
measured by means of a suitable spectrometric detector, the type and amount of an element present can be determined. The gamma-rays emitted may be classed as prompt, occurring within 10-12 seconds of the interaction, or delayed, arising from the decay of the induced radioactivity. (Fig. 4) The former gamma-rays are utilized in Prompt Gamma Neutron Activation Analysis (PGNAA) and the latter in Delayed Gamma Neutron Activation Analysis (DGNAA). The same probe can be used for both PGNAA and DGNAA elemental analysis (Fig. 5).


FIG. 4. Principle of PGNNA and DGNAA methods

Wednesday, 25 May 2016

Instrument Noise

Introdution:
                  Noise is a variation in a measurement of a process variable that does not reflect real changes in the process variable.

                  A signal from a sensor can have many components. This signal will always have as one of its components the process value that we are measuring, but it may also contain noise. Noise is generally a result of the technology used to sense the process variable. Electrical signals used to transmit instrument measurements are susceptible to having noise induced form other electrical devices. Noise can also be caused by wear and tear on mechanical elements of a sensor.

                 Noise may also be uncontrolled random variations in the process itself. Whatever the source, noise distorts the measurement signal.

Effects of Noise: 
                   Noise reduces the accuracy and precision of process measurements. Somewhere in the noise is the true measurement, but where? Noise introduces more uncertainty into the measurement.

                    Noise also introduces errors in control systems. To a controller fluctuation in the process variable from noise are indistinguishable from fluctuations caused by real disturbances. Noise in a process variable will be reflected in the output of the controller.

Eliminating Noise:
                     The most effective means of eliminating noise is to remove the source. Reduce electrically induced noise by following proper grounding techniques; using shielded cabling and physical separation of signal cabling form other electrical wiring. If worn mechanical elements in the sensor are causing noise repair or replace the sensor.
                    When these steps have been taken and excessive noise is still a problem in the process variable a low pass filter may be used.

Low Pass Filters:
                     Smart instruments and most controllers have noise dampening features built in. Most of these noise dampeners are actually low pass filters.

                    A low-pass filter allows the low frequency components of a signal to pass while attenuating the higher frequency components.

                   Fortunately for us, noise tends to fall into the higher end of the frequency spectrum while the underlying process value tends to lie in the lower end.


Selecting a Filter by Cut-off Frequency:
Attenuation of a signal is a reduction in its strength, or amplitude. Attenuation is measured in
decibels (dB).

dB of attenuation = 20 log10(Amplitude In/Amplitude Out)

 For example: let’s say we have an amplitude ratio of 0.95 (the value of the signal out is 95% of
value of the signal in), the dB of attenuation would be:
                                                    20 log10 (.95) = −0.45

                      An attenuation of 0 dB would mean the signal would pass with no reduction in amplitude while a large negative dB would indicate a very small amplitude ratio (at -10 dB of attenuation we would have an amplitude ratio of 0.32).

                      The ideal filter would be designed to pass all signals with 0 dB of attenuation below a cut-off frequency and completely attenuate all frequency components above the cut-off frequency. This ideal filter does not exist in the real world. -3 dB of signal attenuation has been established as the cut-off frequency in filter selection. Figure 3-8 illustrates the effect of a filter with a 3 Hz cut-off frequency on a noisy 1.2 Hz signal. Where a filter is selected by choosing cut-off frequency, select that is above the frequency of your process value.

Selecting a Filter by Time Constant
The effect of a low pass filter is to introduce a first order lag in the process variable response.

Low pass filters may sometimes be referred to as first order lag filters.

Some filters are configured by selecting a time constant for the lag response of the filter. The relationship between the cut-off frequency and the time constant of a low pass is approximately given by:

                  Cut - Off Frequency ≈ .1/ 5 Time Constants

For example, to configure a filter for a cut-off frequency of 60 Hz specify a filter time constant of  seconds
                                      Time Constant ≈ 1/5 Cut - Off Frequency =1/5*60 =0.0033

Bellow Figure shows the step response of the 3 Hz filter illustrating the filter time constant of 0.068 seconds.


Monday, 23 May 2016

Basics of Process Control

What is Open Loop Control?

In open loop control the controller output is not a function of the process variable.In open loop control we are not concerned that a particular Set Point be maintained, the controller output is fixed at a value until it is changed by an operator. Many processes are stable in an open loop control mode and will maintain the process variable at a value in the absence of a disturbance.


Disturbances are uncontrolled changes in the process inputs or resources.

                         However, all processes experience disturbances and with open loop control this will always result in deviations in the process variable; and there are certain processes that are only stable at a given set of conditions and disturbances will cause these processes to become unstable. But for some processes open loop control is sufficient. Cooking on a stove top is an obvious example. The cooking element is fixed at high, medium or low without regard to the actual temperature of what we are cooking. In these processes, an example of open loop control would be the slide gate position on the discharge of a continuous mixer or ingredient bin.

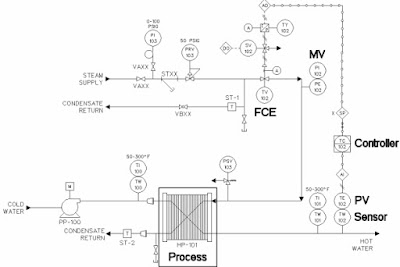
Figure 1-1 depicts the now familiar heat exchanger. This is a stable process, and given no disturbances we would find that the process variable would stabilize at a value for a given valve position, say 110°F when the valve was 50% open. Furthermore, the temperature would remain at 110°F as long as there were no disturbances to the process.

                                                                       Figure 1-1


   However, if we had a fluctuation in steam supply pressure, or if the temperature of the water entering the heat exchanger were to change (this would be especially true for recirculation systems with a sudden change in demand) we would find that the process would move to a new point of stability with a new exit temperature.


What is Closed Loop Control?

                       In closed loop control the controller output is determined by difference between the process variable and the Set Point. Closed loop control is also called feedback or regulatory control.
The output of a closed loop controller is a function of the error.

         Error is the deviation of the process variable from the Set Point and is defined as
                                                                    E = SP - PV.

A block diagram of a process under closed loop control is shown in figure 1-2


                                                                        Figure 1-2

                            An important point of this illustration is that the process, from the controller’s perspective, is larger than just the transformation from cold to hot water within the heat exchanger. From the controllers perspective the process encompasses the RTD, the steam control valve and signal processing of the PV and CO values.

                           How the valve responds to the controller output and its corresponding effect on the manipulated variable (steam pressure) will determine the final effect on the process variable (temperature). The quality and responsiveness of the temperature measurement directly effects how the controller sees its effect on the process. Any filtering to diminish the effects of noise will paint a different picture of the process that the controller sees.

                          The dynamic behaviors of all of the elements in a control loop superimpose to form a single image of the process that is presented to the controller. To control the process requires some understanding of each of these elements.

Figure 1-3 depicts the heat exchanger under closed loop control.

Figure 1-3


What are the Modes of Closed Loop Control?
                          Closed loop control can be Manual, On-Off, PID, Advanced PID (ratio, cascade, feed-forward) or Model Based depending on the algorithm that determines the controller output based on the error.

Manual Control:
                          In manual control an operator directly manipulates the controller output to the final control element to maintain a Set Point.

                          In Figure 1-4 we have placed an operator at the steam valve of the heat exchanger. Their only duty is to look at the temperature of the water exiting the heat exchanger and adjust the steam valve accordingly; we have a manual control system.

                        While such a system would work, it is costly (we're employing someone to just turn a valve), the effectiveness depends on the experience of the operator, and as soon as the operator walks away we are in open loop.

Figure 1-4


On-Off Control: On-Off control provides a controller output of either on or off in response to error.

              As an on-off controller only proves a controller output hat is either on or off, on-off control requires final control elements that have two command positions: on-off, open-closed.

              In Figure 1-5 we have replaced the operator with a thermostat and installed an open-close actuator on the steam valve, we have implemented on-off control.

Figure 1-5

                           As the controller output can only be either on or off, the steam control valve will be either open or closed depending on the thermostat's control algorithm. For this example we know the thermostat's controller output must be on when the process variable is below the Set Point; and we know the thermostat's controller output must be off when the process variable is above the Set Point.

                     But what about when the process variable is equal to the Set Point? The controller output cannot be both on and off.

                    On-off controllers separate the point at which the controller changes its output by a value called the deadband (see Figure 1-6).

Figure 1-5

                 Upon changing the direction of the controller output, deadband is the value that must be traversed before the controller output will change its direction again.

                On the heat exchanger, if the thermostat is configured with a 110°F Set Point and a 20°F deadband, the steam valve will open at 100°F and close at 120°F. If such a large fluctuation from the Set Point is acceptable, then the process is under control.

                If this fluctuation is not acceptable we can decrease the deadband, but in doing so the steam valve
will cycle more rapidly, increasing the wear and tear on the valve, and we will never eliminate the error (remember, the thermostat cannot be both on and off at 110F).


PID Control: PID control provides a controller output that modulates from 0 to 100% in response to error.

                    As an on-off controller only proves a controller output that is either on or off, on-off control requires devices that have two command positions: on-off, open-closed.

                    As a PID controller provides a modulating controller output, PID control requires final control
elements that have can accept a range of command values, such as valve position or pump speed.

To modulate is to vary the amplitude of a signal or a position between two fixed points.

                    The advantage of PID control over on-off Control is the ability to operate the process with smaller error (no deadband) with less wear and tear on the final control elements.


Figure 1-6

Time Proportion Control:
                             Time proportion control is a variant of PID control that modulates the on-off time of a final control element that only has two command positions.

                             To achieve the effect of PID control the switching frequency of the device is modulated in response to error. This is achieved by introducing the concept of cycle time.

                             Cycle Time is the time base of the signal the final control element will receive from the controller. The PID controller determines the final signal to the controller by multiplying the cycle time by the output of the PID algorithm.

                             In Figure 1-7 we have a time proportion controller with a cycle time of 10 seconds. When the PID algorithm has an output of 100% the signal to the final control element will be on for 10 seconds and then repeat. If the PID algorithm computes a 70% output the signal to the final control element will be on for 7 seconds and off for 3 and then repeat.


Figure 1-7

                           While time proportion control can give you the benefits of PID control with less expensive final control elements it does so at the expense of wear and tear on those final control elements.Where used, output limiting should be configured on the controller to inhibit high frequency switching of the final control element at low controller outputs.


What are the Basic Elements of Process Control?
                            Controlling a process requires knowledge of four basic elements, the process itself, the sensor that measures the process value, the final control element that changes the manipulated variable, and the controller.

Figure 1-8

The Process: 
                   We have learned that processes have a dynamic behavior that is determined by physical properties; as such they cannot be altered without making a physical change to the process.

Sensors
                   Sensors measure the value of the process output that we wish to effect. This measurement is called the Process Variable or PV. Typical Process Variables that we measure are temperature, pressure, mass, flow and level. The Sensors we use to measure these values are RTDs, pressure gauges and transducers, load cells, flow meters and level probes.

Final Control Elements: 
                   A Final Control Element is the physical device that receives commands from the controller to manipulate the resource. Typical Final Control Elements used in these processes are valves and pumps.

The Controller: 
                    A Controller provides the signal to the final element. A controller can be a person, a switch, a single loop controller, or DCS / PLC system.